Gone are those days when you apply for Adsense account and get approved without much stress but now, Google Adsense has grown a lot bigger over the years with millions of active publishers and because of this, their policies have become very strict giving a hard time to those who want to get their account approved. Also, it has become very common to see older accounts getting suspended due to flimsy excuses. To get an approved Adsense account, you might have many times, maybe you’ve never tried at all, maybe you’re worried if you’ll ever got approved… put all that negative brain waves aside, this post will get you an approved Adsense account within 2 hours if properly followed and implemented.
I know you have been waiting for this, so I won’t waste any sec of your precious time trying to bore you with reasons why you need an Adsense account or why your request was not approved, just let get this started right away.
Create a New Gmail account (tip: Choose United State as your location, some countries like Nigeria are not allowed to monetize Youtube videos).
Login to youtube with your newly created Google account
Click on youtube.com/account_monetization
Enable your Youtube account for monetization
You should receive a message in your inbox saying your youtube account is ready for monetization
After the message upload a unique video to Youtube
Be sure to add right descriptions and related tags to your video
Wait for the upload to complete and hit publish

Now that your video is monetized, what about Adsense Account?
Now go to Channel Settings>Monetization
Now you should see your account status.
Click on “How will I be paid”?
Now click on “associate an Adsense account”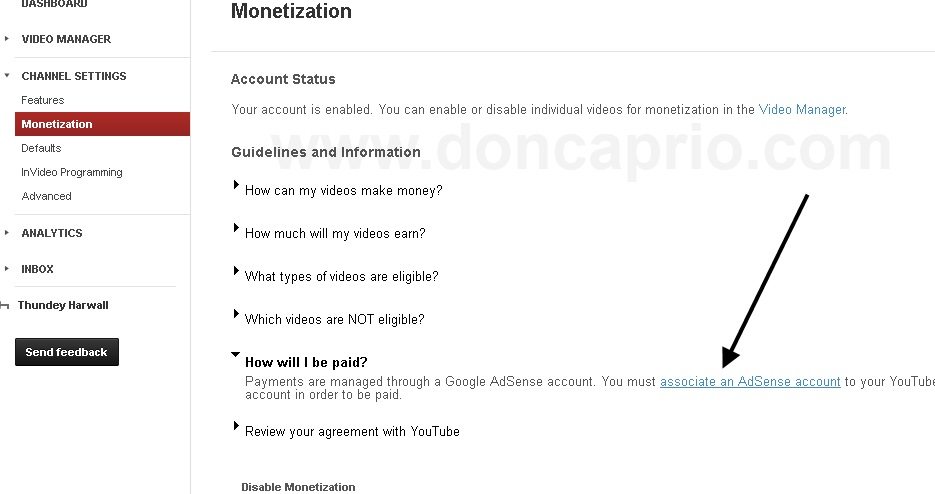
Then you will be taking to where you will setup your Adsense account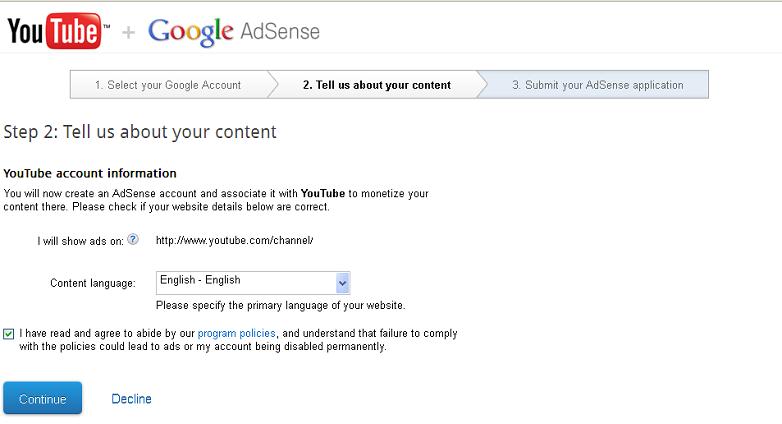
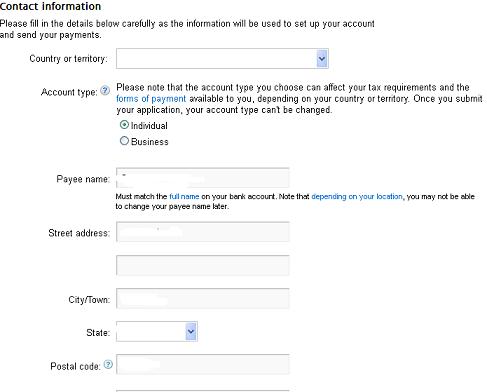
Click submit and wait for your approval within 2 hours
Okay, waiting……1hour…2hours….Now check your mail
Wow! You’ve got an approved adsense account!
Okay, the next step is to show ads on your blog/site
If you’re using blogspot domain, (hosted account) this is very simple to do
Login to your Adsense account and click on account settings
Scroll down to the bottom to locate invite, enter the email of your blogger account and click on invite
Check your inbox to verify the invitation, after successfully verification you can now login to your approved adsense with your blogspot email address and password
you’ve enabled ads to be showing on your sidebar or body content. After verification you should be able to see blank ads space on your blog, within 30 minutes real ads show be live on your blog.
If you’re using custom domain, I must tell you that Google has changed its policy for approving accounts via host partnered sites (custom domain), which require you to fill out a form and get approval from Adsense team before the ads begin to show on your non-hosted sites. Remember I said earlier that if you’re using hosted site (like .blogspot) you don’t need all this. To fill this form:
I know you have been waiting for this, so I won’t waste any sec of your precious time trying to bore you with reasons why you need an Adsense account or why your request was not approved, just let get this started right away.
- Now login to your Blogger account (where you want to show ads) click on earning tab
- Click on switch Adsense account
- Login to your Adsense account to associate your approved Adsense account with your blog
If you’re using custom domain, I must tell you that Google has changed its policy for approving accounts via host partnered sites (custom domain), which require you to fill out a form and get approval from Adsense team before the ads begin to show on your non-hosted sites. Remember I said earlier that if you’re using hosted site (like .blogspot) you don’t need all this. To fill this form:
- Login in to your AdSense account.
- On the Home tab, click the Account settings page.
- In the “Access and authorization” section, next to “Only host sites are allowed to show ads for your account,” click edit.
- On the “Show ads on other websites” page that appears, enter the URL of the site where you plan to show ads.
- Click Submit.
- Finally you need to implement AdSense ad code on the URL that you provided above, on a page that receives traffic.
- Once your request is approved, you can place your ad code on any website that you own without any further approvals. If your application is not approved, you should receive a message in your adsense account stating reason why your site is not approved, meanwhile you still got your approved adsense account and you can correct the errors and resubmit again.
You can see that blogspots domain (hosted account) got their ads up and running very easily and quickly; even with only a single post, Adsense will still be displaying on your blog, this is the reason I believe you see many blogspot domain running adsense with low quality content. That is it, guys..
No comments:
Post a Comment